前言
参考链接如下所示:
一、Redis 实现消息队列
1.1 Redis 列表类型回顾
列表类型(list)可以存储一个有序的字符串列表,常用的操作是向列表两端添加元素,或者获得列表的某个片段。列表类型内部是使用双向链表(double linked list)实现的。可以用来用来实现队列,并且支持阻塞式读取,可以很容易的实现一个高性能的优先队列。list操作回顾传送门。
1.2 Java 程序实现消息队列
-
redis.properties
redis.url=192.168.30.200 redis.port=6379 redis.maxIdle=30 redis.minIdle=10 redis.maxTotal=100 redis.maxWait=10000 -
使用连接池访问redis
public class JedisPoolUtils { private static JedisPool pool = null; static { //加载配置文件 InputStream in = JedisPoolUtils.class.getClassLoader().getResourceAsStream("redis.properties"); Properties pro = new Properties(); try { pro.load(in); } catch (IOException e) { e.printStackTrace(); } //获得池子对象 JedisPoolConfig poolConfig = new JedisPoolConfig(); poolConfig.setMaxIdle(Integer.parseInt(pro.get("redis.maxIdle").toString()));//最大闲置个数 poolConfig.setMaxWaitMillis(Integer.parseInt(pro.get("redis.maxWait").toString()));//最大闲置个数 poolConfig.setMinIdle(Integer.parseInt(pro.get("redis.minIdle").toString()));//最小闲置个数 poolConfig.setMaxTotal(Integer.parseInt(pro.get("redis.maxTotal").toString()));//最大连接数 pool = new JedisPool(poolConfig, pro.getProperty("redis.url"), Integer.parseInt(pro.get("redis.port").toString())); } //获得jedis资源的方法 public static Jedis getJedis() { return pool.getResource(); } public static void main(String[] args) { Jedis jedis = getJedis(); System.out.println(jedis); } } -
消息生产者(开启多线程生产消息)
public class MessageProducer extends Thread { public static final String MESSAGE_KEY = "message:queue"; private volatile int count; public void putMessage(String message) { Jedis jedis = JedisPoolUtils.getJedis(); //jedis.select(1); Long size = jedis.lpush(MESSAGE_KEY, message); System.out.println(Thread.currentThread().getName() + " put message,size=" + size + ",count=" + count); count++; } @Override public synchronized void run() { for (int i = 0; i < 5; i++) { putMessage("message" + count); } } public static void main(String[] args) { MessageProducer messageProducer = new MessageProducer(); Thread t1 = new Thread(messageProducer, "thread1"); Thread t2 = new Thread(messageProducer, "thread2"); Thread t3 = new Thread(messageProducer, "thread3"); t1.start(); t2.start(); t3.start(); } }-
运行结果
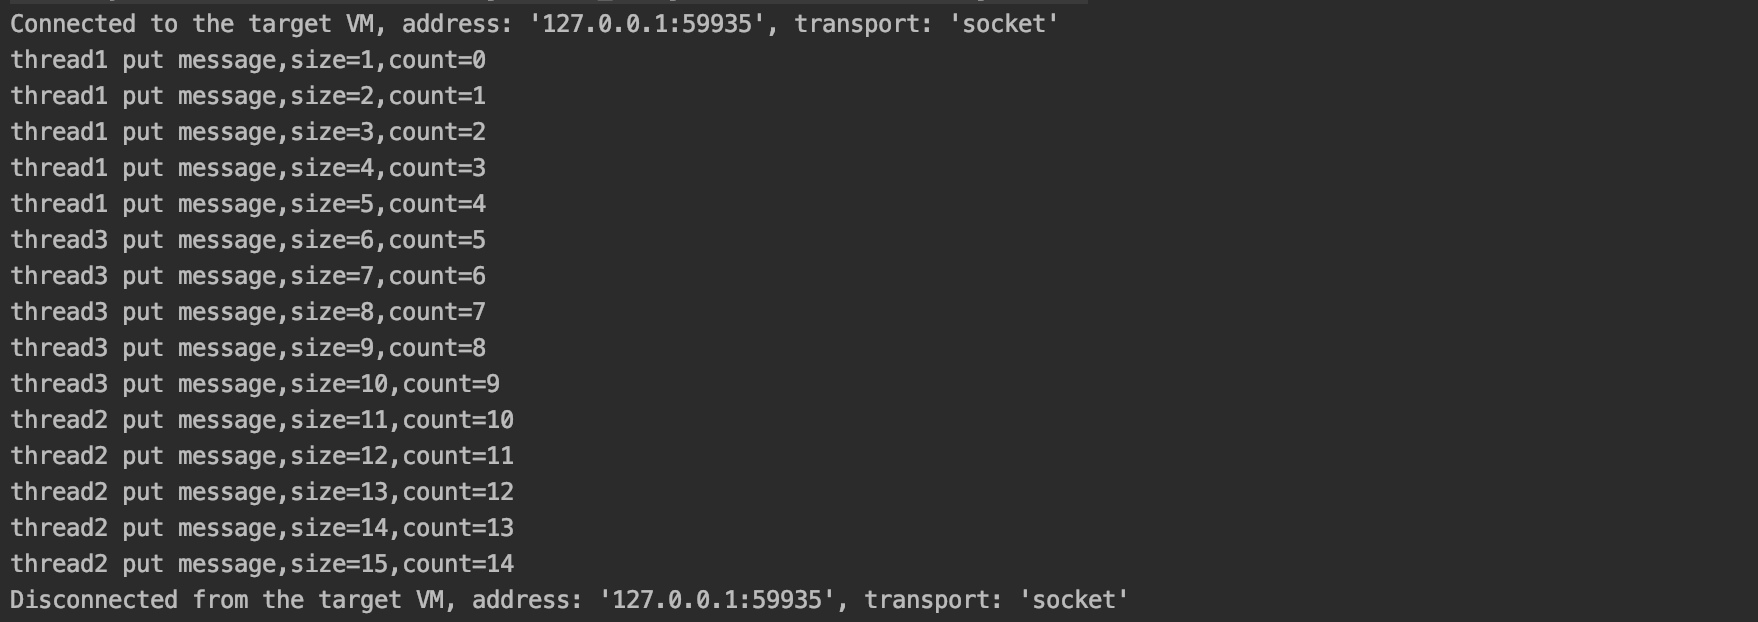
Tips:由上图可知,redis 是单线程操作的,只能一个一个的操作。
-
redis 后台查看
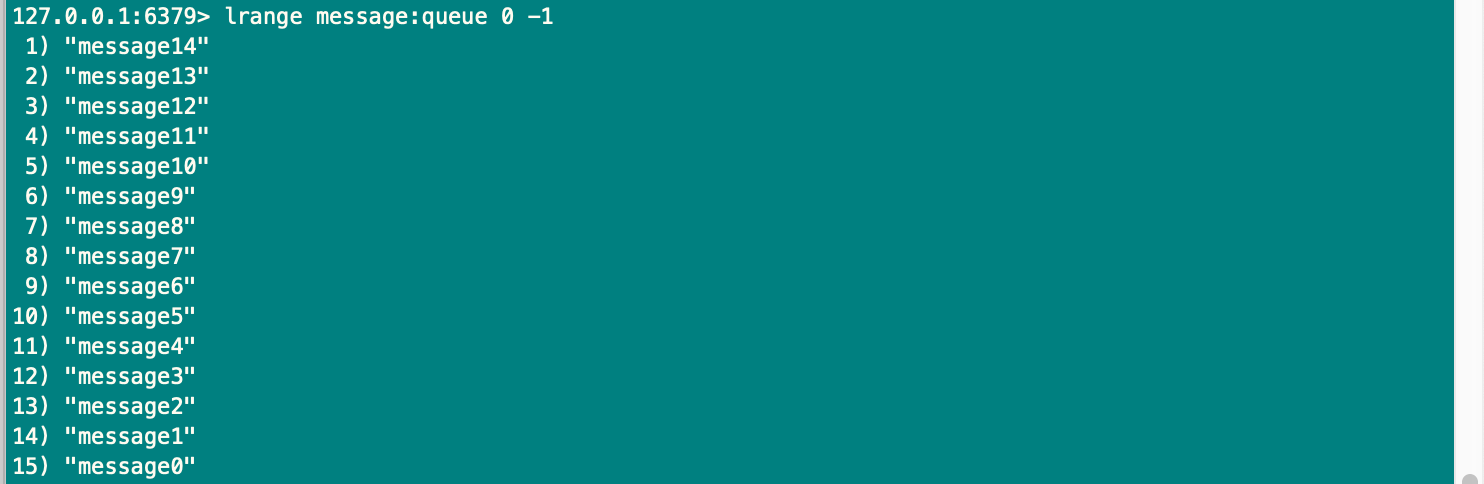
Tips:使用
lrange命令查看数据时可知,lpush命令插入数据是从左向右操作的。
-
-
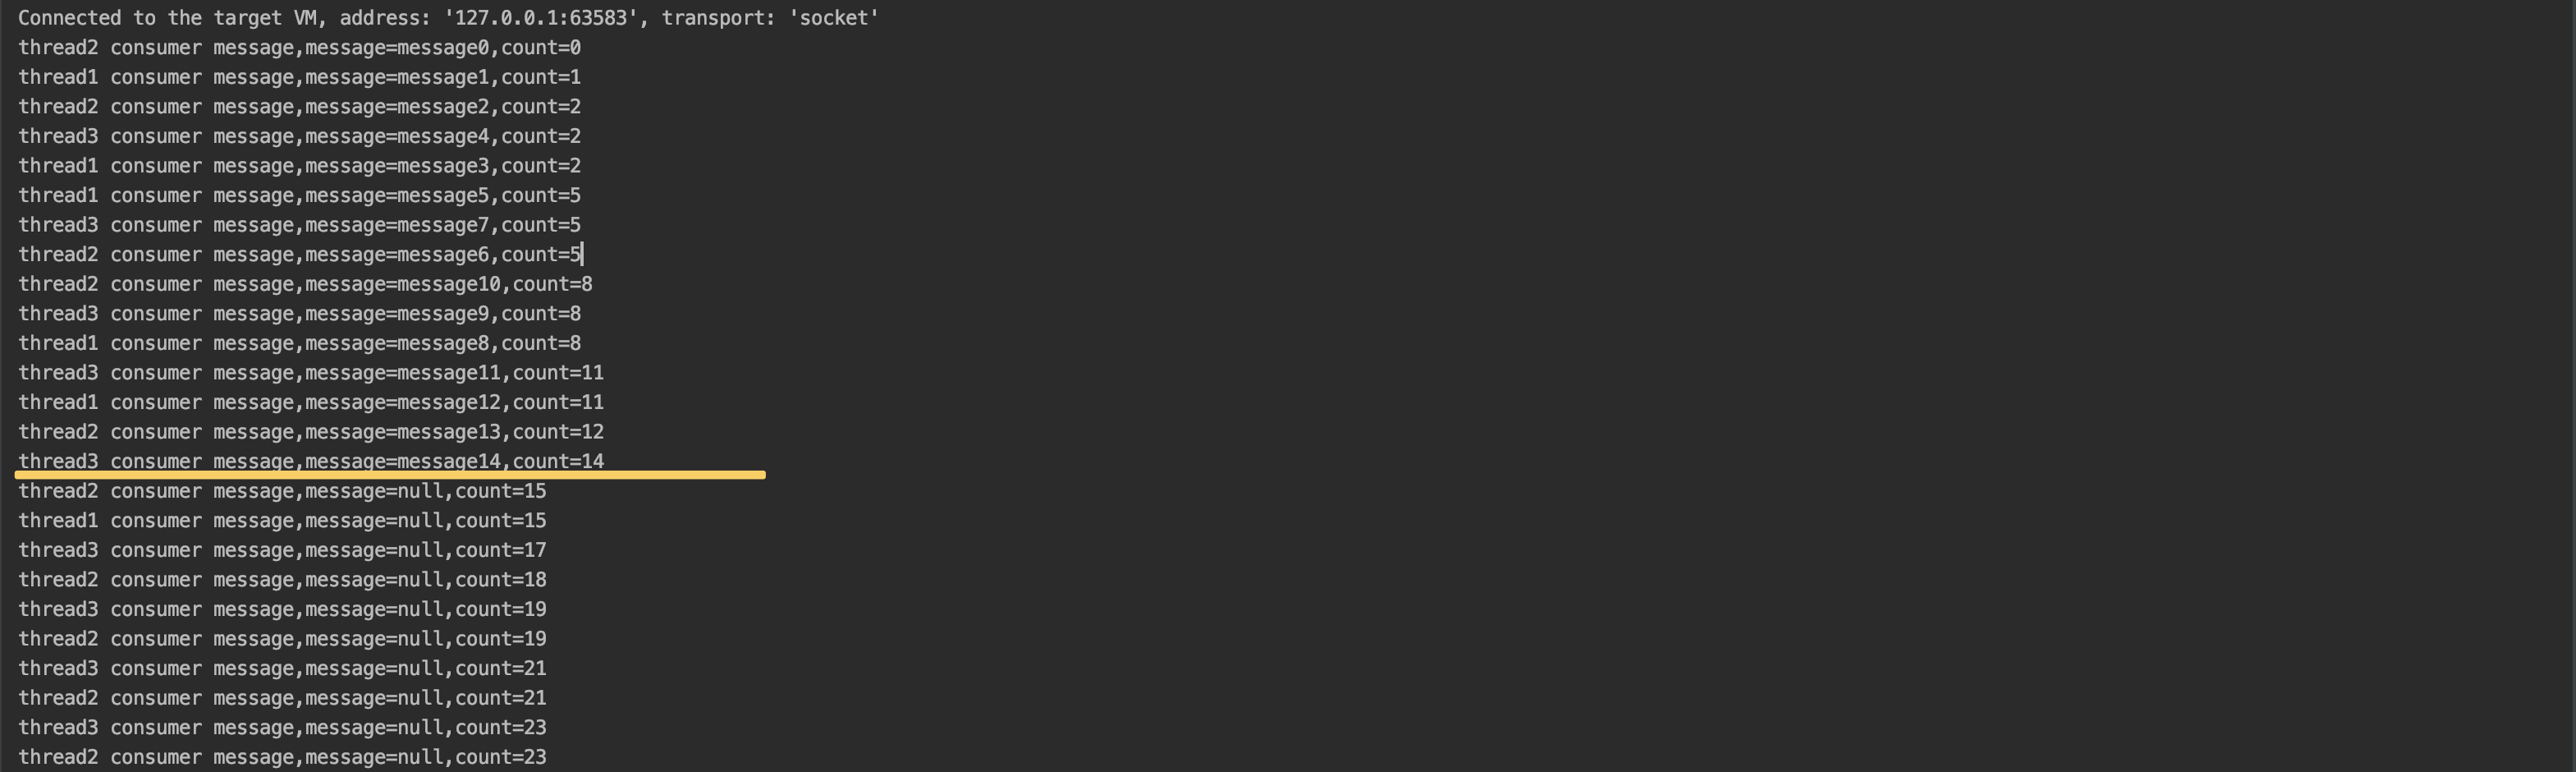
消息消费者(开启多线程消息消息)
public class MessageConsumer implements Runnable { public static final String MESSAGE_KEY = "message:queue"; private volatile int count; public void consumerMessage() { Jedis jedis = JedisPoolUtils.getJedis(); String message = jedis.rpop(MESSAGE_KEY); System.out.println(Thread.currentThread().getName() + " consumer message,message=" + message + ",count=" + count); count++; } @Override public void run() { while (true) { consumerMessage(); } } public static void main(String[] args) { MessageConsumer messageConsumer = new MessageConsumer(); Thread t1 = new Thread(messageConsumer, "thread1"); Thread t2 = new Thread(messageConsumer, "thread2"); Thread t3 = new Thread(messageConsumer, "thread3"); t1.start(); t2.start(); t3.start(); } }-
运行结果
-
运行结果分析-
消费者消费消息时需要
不停的调用 rpop 方法查看 List 队列中是否有待处理的消息。而且消息消费完了,但是还是会不停的调用 rpop方法,从而造成多余的连接浪费。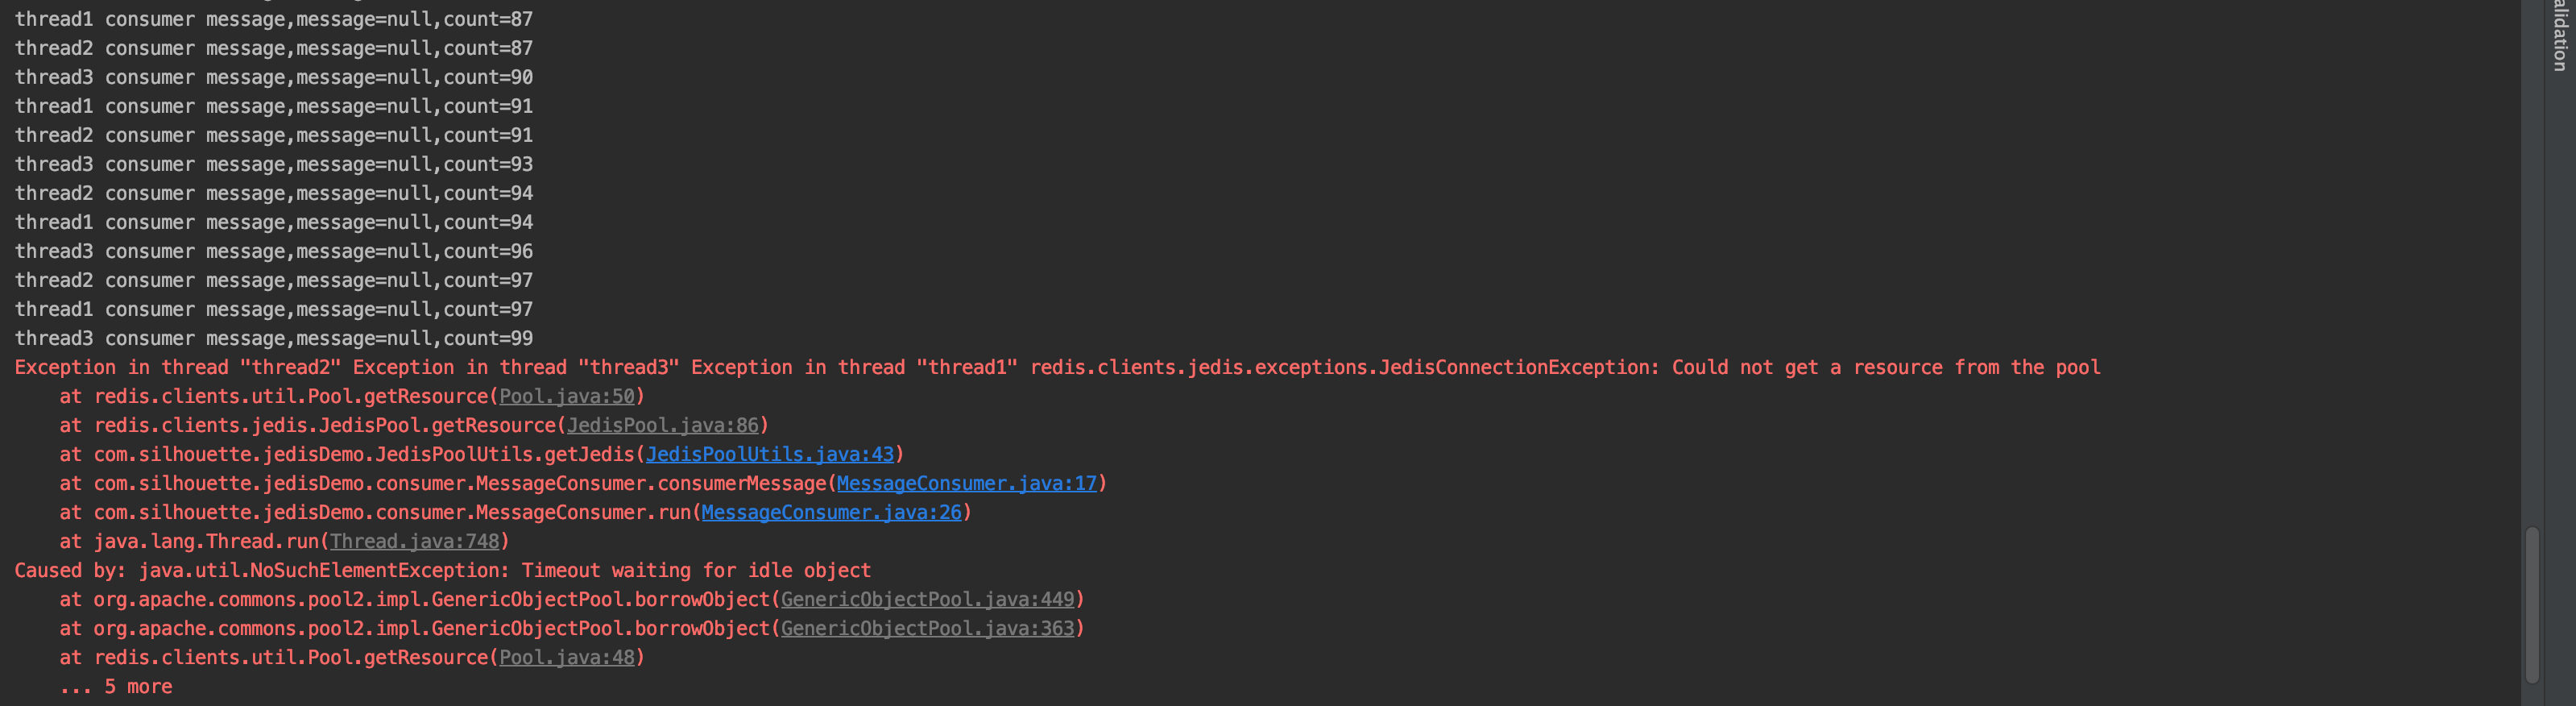
-
也许你会使用
Thread.sleep()等方法让消费者线程隔一段时间再消费,但是这样做也会出现如下问题:- 当生产消息的速度大雨消费消息的速度时,会造成消息队列越来越大,时间久了就会占用大量的内存空间
- 当休眠的时间过程就无法实时消费消息;休眠时间过短,消费不到消息,造成连接资源的浪费。
-
-
1.3 brpop和blpop实现阻塞读取
为解决上述一直调用 rpop 或 lpop 命令造成的连接浪费。redis 提供了阻塞式命令 brpop 和 blpop 命令。brpop 命令可以接收多个键,其语法:BRPOP key [key ...] timeout。该命令检测多个键,如果所有键都没有元素则阻塞,如果其中一个有元素则从该键中弹出该元素。
-
示例1
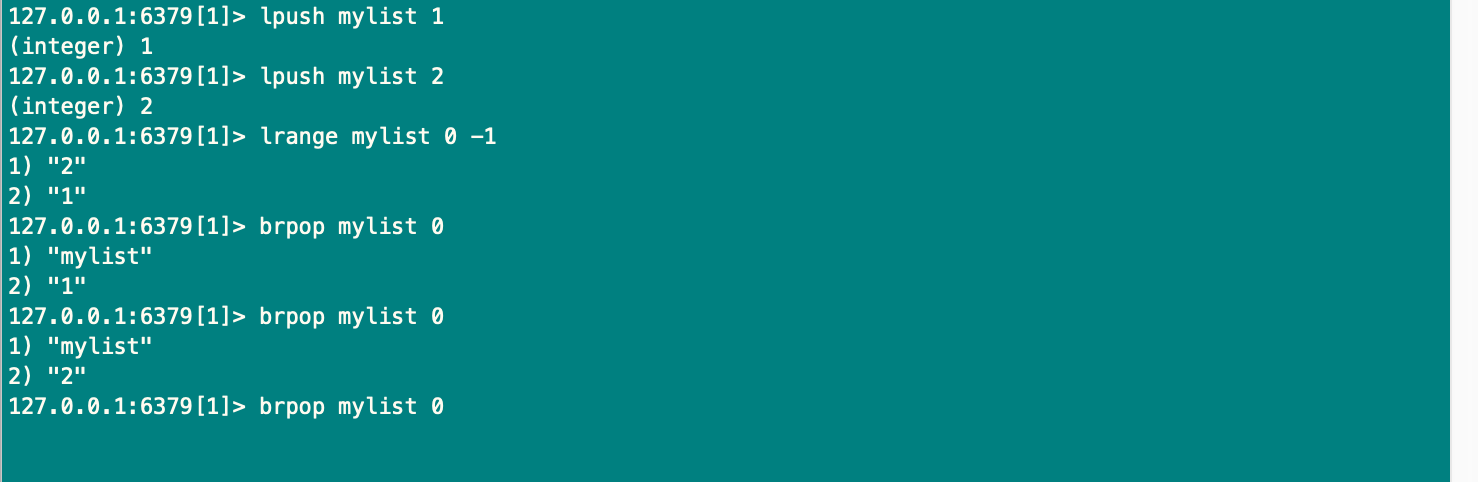
Tips:会按照 key 的顺序进行读取,可以实现具有优先级的队列。当队列中无消息时会进行阻塞。
-
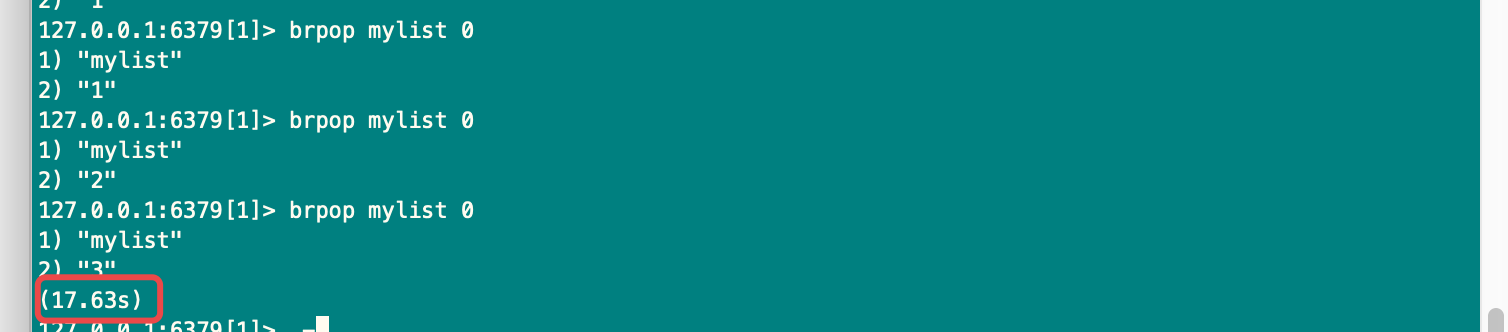
测试2:
-
往阻塞的队列中添加消息

-
查看第一个客户端的阻塞是否放行
-
-
使用 brpop 或 blpop 命令优化上述代码
public class NewConsumer implements Runnable{ public static final String MESSAGE_KEY = "message:queue"; private Jedis jedis = JedisPoolUtils.getJedis(); public void consumerMessage() { //0是timeout,返回的是一个集合,第一个是消息的key,第二个是消息的内容 List<String> result = jedis.brpop(0,MESSAGE_KEY); System.out.println("brpop result=" + result); } @Override public void run() { while (true) { consumerMessage(); } } public static void main(String[] args) { //new NewConsumer().consumerMessage(); NewConsumer consumer = new NewConsumer(); Thread t1 = new Thread(consumer, "thread1"); t1.start(); } }-
先清空数据库,先启动消费者,因为是没有数据的,会阻塞在这里,控制台就没有任何的输出
-
当启动生产者生产消息后,消费者会自动消费消息,消费完毕后会阻塞停滞在这里,知直到有新的消息产生。

-
二、订阅与发布模式
2.1 订阅与发布
Redis 通过PUBLISH、SUBSCRIBE等命令实现了订阅与发布模式,这个功能提供两种信息机制,分别是订阅/发布到频道和订阅/发布到模式。“发布/订阅”包含了两种角色,分别是消息的发布者和消息的订阅者。订阅者可以订阅一个或多个频道(channel),而发布者可以向指定的频道(channel)发送消息,所有订阅该频道的订阅者都会收到此消息。
2.2 订阅/发布到频道
-
订阅频道
-
Redis 的
SUBSCRIBE命令可以让客户端订阅任意数量的频道,每当有新信息发送到被订阅的频道时,信息就会被发送给所有订阅指定频道的客户端。频道与客户端关系见下图: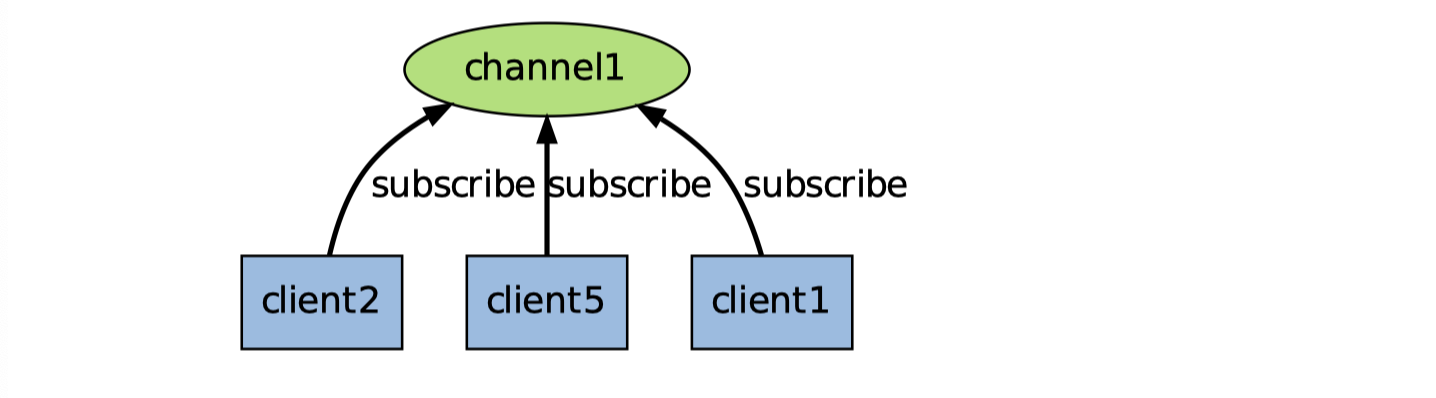
-
订阅频道使用subscribe 命令,语法:
subscribe channel1 [channel2 ...] -
使用示例:
127.0.0.1:6379> subscribe channel:1
Reading messages... (press Ctrl-C to quit)
1) "subscribe"
2) "channel:1"
3) (integer) 1
Tips:执行上述命令后客户端就进入了订阅状态,处于此状态的客户端不能使用处
subscribe、unsubscribe、psubscribe和punsubscribe这四个属于“发布/订阅”之外的命令否则会报错 -
消息类型的取值:
-
subscribe:表示订阅成功后的反馈,第二个值是订阅的频道名称,第三个值时当前客户端订阅的频道数量。127.0.0.1:6379> subscribe channel:1 Reading messages... (press Ctrl-C to quit) 1) "subscribe" 2) "channel:1" 3) (integer) 1 -
message:表示接受到消息的反馈,第二个值表示订阅的频道名称,第三个值表示接受的消息的具体内容-
发送消息
127.0.0.1:6379> publish channel:1 'hi,silhouette!' (integer) 1 -
接受消息
1) "message"
2) "channel:1"
3) "hi,silhouette!"
-
-
unsubscribe:表示取消订阅的反馈,第二个值表示取消订阅的频道名称,第三个值表示当前客户端订阅的频道数,当此值为0时会退出订阅状态。127.0.0.1:6379> unsubscribe channel:1 1) "unsubscribe" 2) "channel:1" 3) (integer) 0
-
-
-
发布信息
-
当有新的信息通过
PUBLISH命令发送给频道 channel1 时,这个消息就会被发送给订阅它的三个客户端: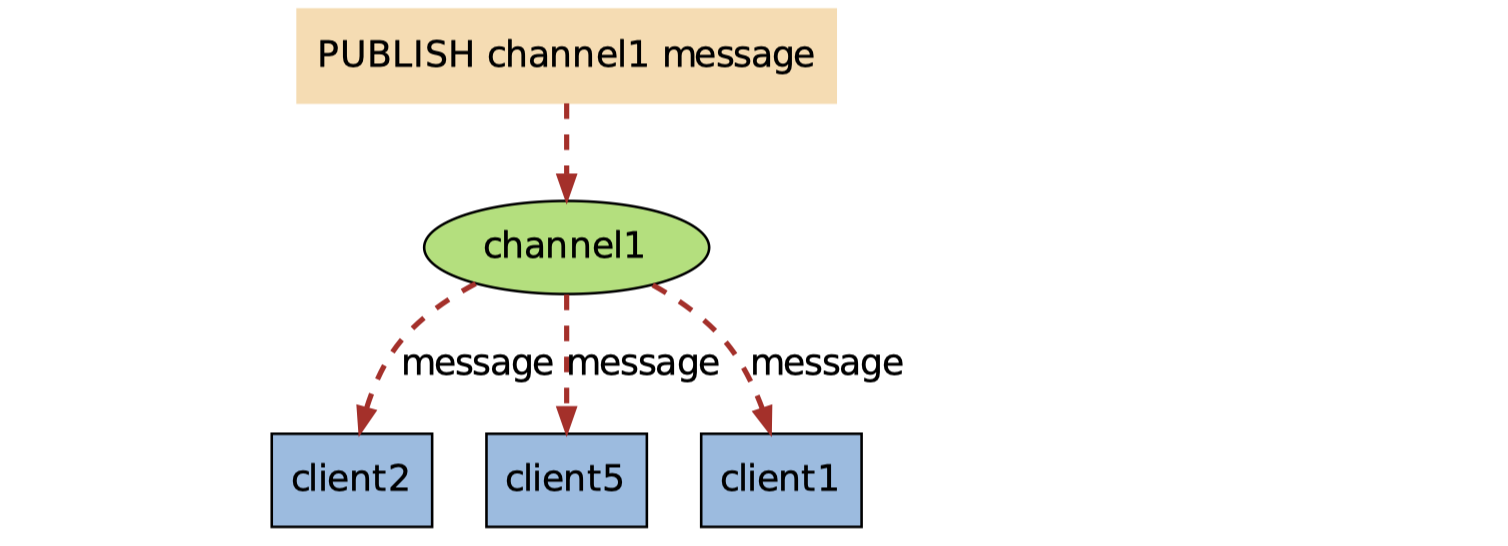
-
发布消息使用 publish命令,语法:
publish channel message -
使用示例:
127.0.0.1:6379> publish channel1:1 hi
(integer) 0
Tips:返回值表示接受这条消息的订阅者数量。发出去的消息不会被持久化,也就是说客户端订阅 channel1 后只能接受到后续发布到该频道的消息,之前的就接受不到了。
-
2.3 订阅/发布到模式
当我们使用PUBLISH命令发送信息到某个频道时,不仅所有订阅该频道的客户端会收到信息,如果有某个/某些模式和这个频道匹配的话,那么所有订阅这个。这些频道的客户端也同样会收到信息。注意此时使用psubscribe命令进行订阅频道,此命令支持通配符格式,语法:psubscribe pattern [pattern ...]。
Tips:通配符中
?表示一个占位符,*表示任意个占位符(包括0),?*表示1一个以上的占位符
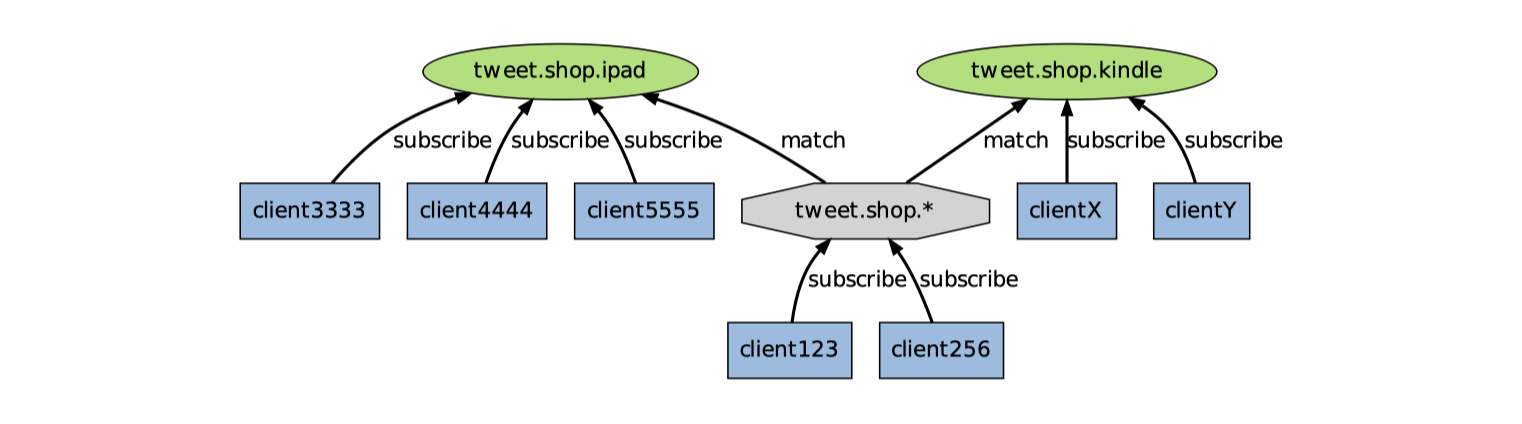
下图展示课一个带频带和模式的例子,其中 tweet.shop.* 模式匹配了 tweet.shop.kindle 频道和 tweet.shop.ipad 频道,并且有不同的客户端分别订阅他们三个:
-
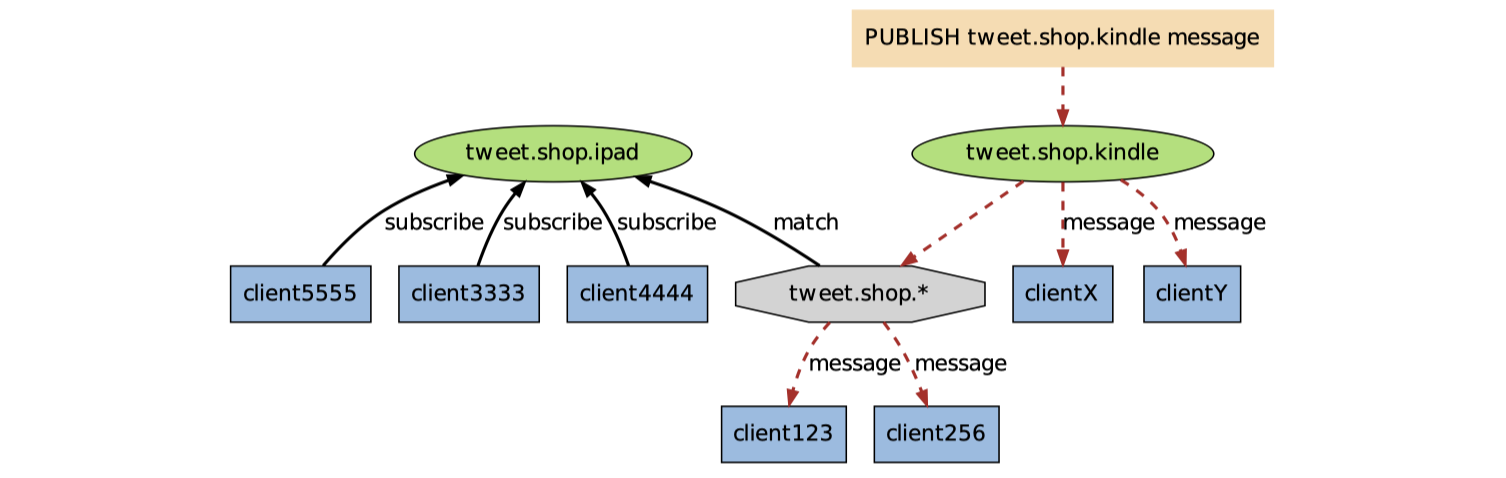
当有信息发送到 tweet.shop.kindle 频道时,信息除了发送给 cllientX 和 clientY 之外,还会发送给订阅tweet.shop.* 模式的 client123 和 client256:
-
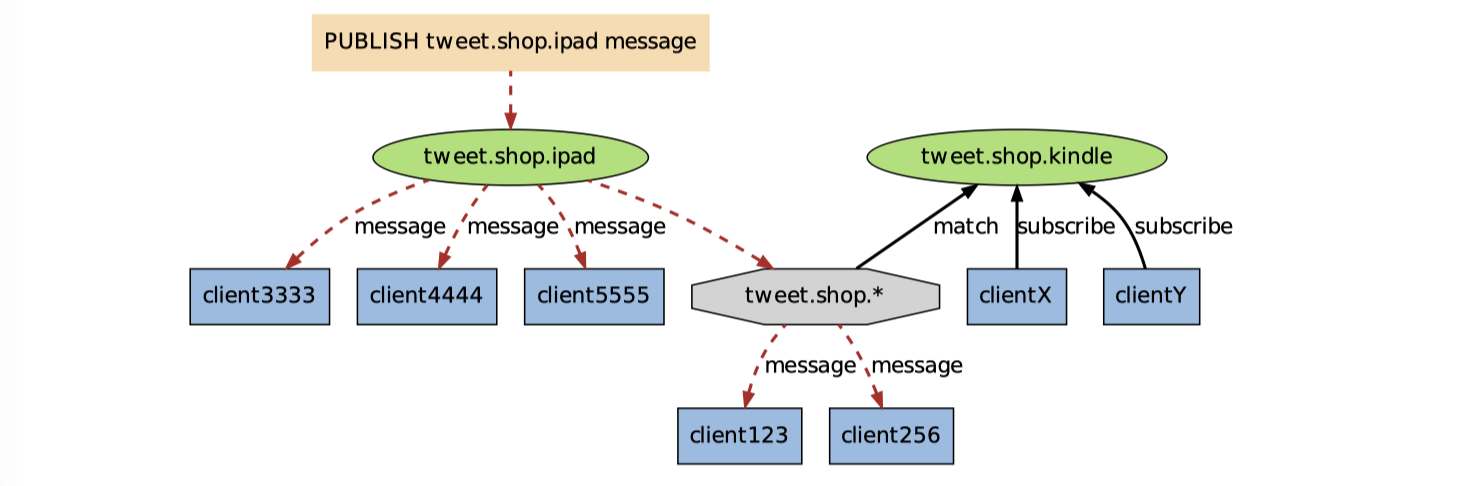
另一方面,如果接受到信息的是频道tweet.shop.ipad,那么 client123 和 client256同样会接受到信息:
-
实例演示
-
订阅三个频道
127.0.0.1:6379> psubscribe tweet.shop.ipad tweet.shop.* tweet.shop.kindle Reading messages... (press Ctrl-C to quit) 1) "psubscribe" 2) "tweet.shop.ipad" 3) (integer) 1 1) "psubscribe" 2) "tweet.shop.*" 3) (integer) 2 1) "psubscribe" 2) "tweet.shop.kindle" 3) (integer) 3 -
向 tweet.shop.kindle 频道发布一个消息
-
发送消息
127.0.0.1:6379> publish tweet.shop.kindle hi (integer) 2 -
接受消息
1) "pmessage"
2) "tweet.shop.*" 			# 监听管道名
3) "tweet.shop.kindle"  # 实际管道名
4) "hi"
1) "pmessage"
2) "tweet.shop.kindle"
3) "tweet.shop.kindle"
4) "hi"
-
-
向 tweet.shop.ipad 频道发布一个消息
-
发送消息
127.0.0.1:6379> publish tweet.shop.ipad hello (integer) 2 #返回值表示接受消息的客户端数 -
接受消息
1) "pmessage"
2) "tweet.shop.ipad"
3) "tweet.shop.ipad"
4) "hello"
1) "pmessage"
2) "tweet.shop.*"
3) "tweet.shop.ipad"
4) "hello"
-
-
取消订阅
# 语法: punsubscribe [pattern [pattern ...]],如果没有参数则会退订所有规则。
127.0.0.1:6379> punsubscribe tweet.shop.*
1) "punsubscribe"
2) "tweet.shop.*"
3) (integer) 0
-
2.4 Java 实现发布者订阅者模式
-
订阅/发布到频道
-
编写消息生产者
-
代码示例
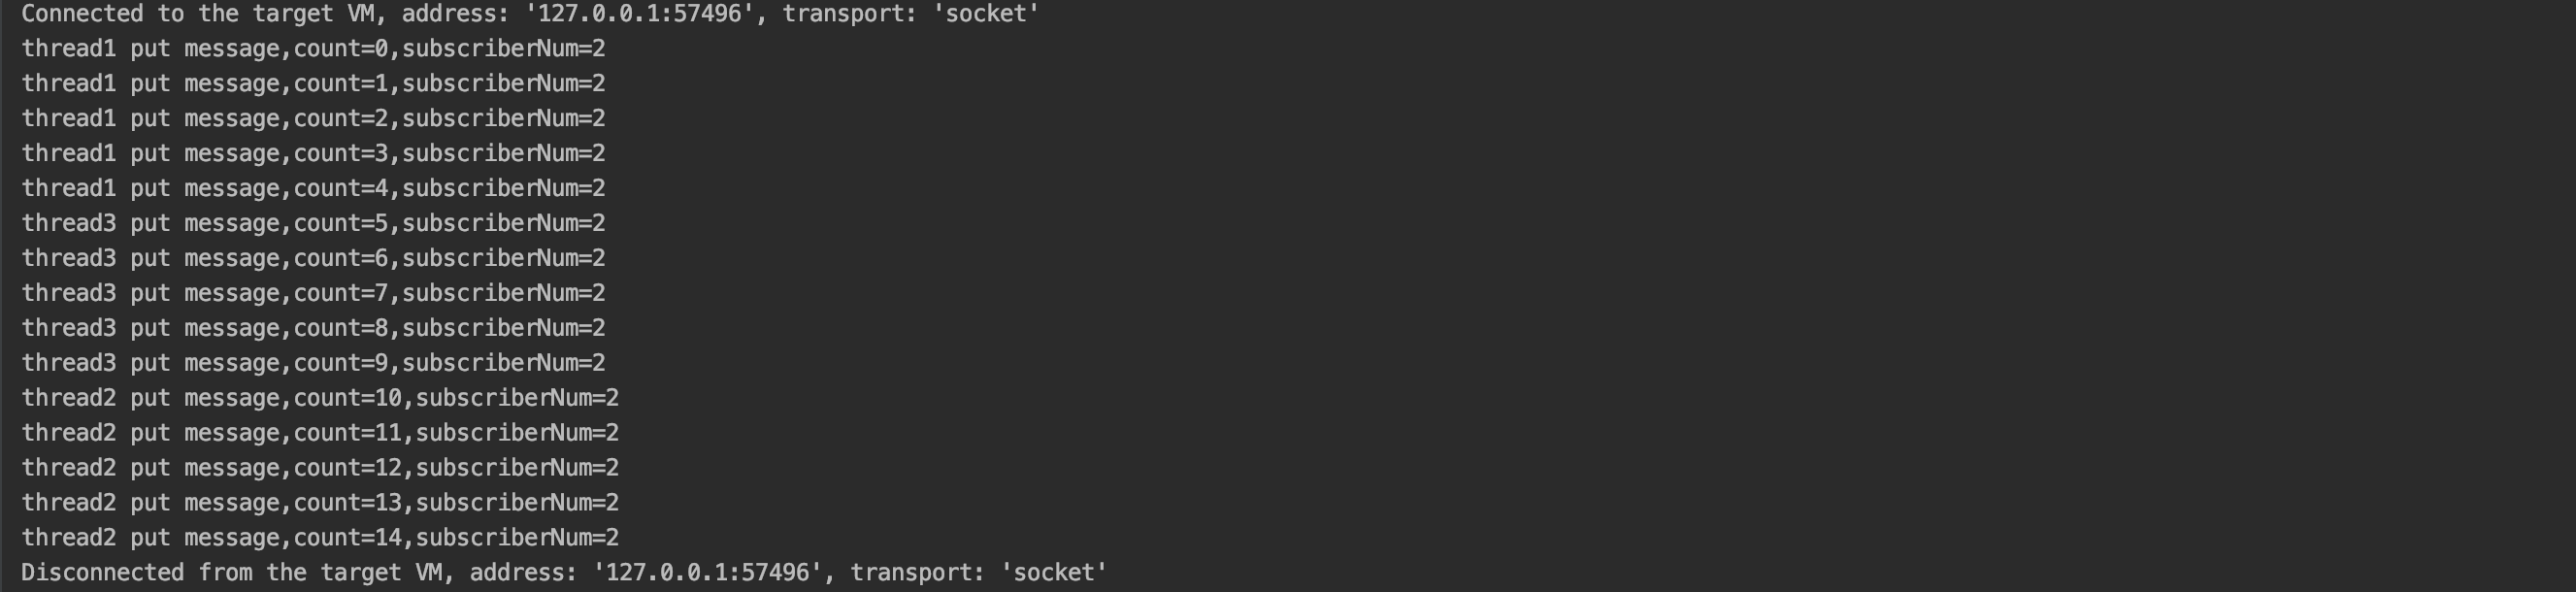
public class MessageProducer extends Thread { public static final String CHANNEL_KEY = "mychannel"; private volatile int count; public void putMessage(String message) { Jedis jedis = JedisPoolUtils.getJedis(); Long publish = jedis.publish(CHANNEL_KEY, message);//返回订阅者数量 System.out.println(Thread.currentThread().getName() + " put message,count=" + count+",subscriberNum="+publish); count++; } @Override public synchronized void run() { for (int i = 0; i < 5; i++) { putMessage("message" + count); } } public static void main(String[] args) { MessageProducer producter = new MessageProducer(); Thread t1 = new Thread(producter, "thread1"); Thread t2 = new Thread(producter, "thread2"); Thread t3 = new Thread(producter, "thread3"); t1.start(); t2.start(); t3.start(); } } -
运行结果
-
-
编写
subscribe订阅者-
代码示例
public class MessageClient implements Runnable {

    public static final String CHANNEL_KEY = "mychannel";//频道
    public static final String EXIT_COMMAND = "exit";//结束程序的消息
    public static final String QUIT_COMMAND = "unsubscribe";//取消订阅
    public void consumerMessage() {
        Jedis jedis = JedisPoolUtils.getJedis();
        //第一个参数是处理接收消息,第二个参数是订阅的消息频道
        jedis.subscribe(new MyJedisPubSub(), CHANNEL_KEY);
    }

    @Override
    public void run() {
        while (true) {
            consumerMessage();
        }
    }

    public static void main(String[] args) {
        MessageClient messageConsumer = new MessageClient();
        Thread t1 = new Thread(messageConsumer, "thread1");
        t1.start();
    }
}

/**
 * 继承JedisPubSub,重写接收消息的方法
 */
class MyJedisPubSub extends JedisPubSub {
    @Override
    /** JedisPubSub类是一个没有抽象方法的抽象类,里面方法都是一些空实现
     * 所以可以选择需要的方法覆盖,这儿使用的是SUBSCRIBE指令,所以覆盖了onMessage
     * 如果使用PSUBSCRIBE指令,则覆盖onPMessage方法
     * 当然也可以选择BinaryJedisPubSub,同样是抽象类,但方法参数为byte[]
     **/
    public void onMessage(String channel, String message) {
        System.out.println(Thread.currentThread().getName()+"-接收到消息:channel=" +
                           channel + ",message=" + message);
        //接收到exit消息后退出
        if (MessageClient.EXIT_COMMAND.equals(message)) {
            System.exit(0);
        }else if (MessageClient.QUIT_COMMAND.equals(message)){
            unsubscribe(channel);
        }
    }

  	@Override
    public void unsubscribe(String... channels) {
        System.out.println("执行取消订阅操作");
        super.unsubscribe(channels);
    }
}
-
-
测试:先启动消费者,再启动生产者,查看两者控制台的输出

-
-
订阅/发布到模式
-
编写
psubscribe订阅者public class MessageNewClient implements Runnable{ public static final String CHANNEL_KEY = "channel*";//频道 public static final String EXIT_COMMAND = "exit";//结束程序的消息 public void consumerMessage() { Jedis jedis = JedisPoolUtils.getJedis(); jedis.psubscribe(new MineJedisPubSub(), CHANNEL_KEY); } @Override public void run() { while (true) { consumerMessage(); } } public static void main(String[] args) { MessageNewClient client = new MessageNewClient(); Thread t1 = new Thread(client,"thread1"); t1.start(); } } /** * 继承JedisPubSub,重写接收消息的方法 */ class MineJedisPubSub extends JedisPubSub { @Override public void onPMessage(String pattern, String channel, String message) { System.out.println(Thread.currentThread().getName()+"-接收到消息:pattern="+pattern+",channel=" + channel + ",message=" + message); //接收到exit消息后退出 if (MessageNewClient.EXIT_COMMAND.equals(message)) { System.exit(0); } } }Tips:更多操作请查看
JedisPubSub类的相关属性和方法
-
2.5 Spring 实现发布/订阅模式
-
pom.xml导入依赖包
<dependencies> <!-- Spring --> <dependency> <groupId>org.springframework</groupId> <artifactId>spring-context</artifactId> <version>${spring.version}</version> </dependency> <dependency> <groupId>org.springframework</groupId> <artifactId>spring-beans</artifactId> <version>${spring.version}</version> </dependency> <dependency> <groupId>org.springframework</groupId> <artifactId>spring-webmvc</artifactId> <version>${spring.version}</version> </dependency> <dependency> <groupId>org.springframework</groupId> <artifactId>spring-jdbc</artifactId> <version>${spring.version}</version> </dependency> <dependency> <groupId>org.springframework</groupId> <artifactId>spring-aspects</artifactId> <version>${spring.version}</version> </dependency> <dependency> <groupId>org.springframework</groupId> <artifactId>spring-jms</artifactId> <version>${spring.version}</version> </dependency> <dependency> <groupId>org.springframework</groupId> <artifactId>spring-context-support</artifactId> <version>${spring.version}</version> </dependency> <dependency> <groupId>org.springframework</groupId> <artifactId>spring-test</artifactId> <version>${spring.version}</version> </dependency> <dependency> <groupId>junit</groupId> <artifactId>junit</artifactId> <version>4.12</version> <scope>test</scope> </dependency> <!-- https://mvnrepository.com/artifact/redis.clients/jedis --> <dependency> <groupId>redis.clients</groupId> <artifactId>jedis</artifactId> <version>2.9.0</version> </dependency> <!-- https://mvnrepository.com/artifact/org.springframework.data/spring-data-redis --> <dependency> <groupId>org.springframework.data</groupId> <artifactId>spring-data-redis</artifactId> <version>2.1.8.RELEASE</version> </dependency> <dependency> <groupId>org.springframework.data</groupId> <artifactId>spring-data-jpa</artifactId> <version>2.1.8.RELEASE</version> </dependency> <dependency> <groupId>org.springframework.data</groupId> <artifactId>spring-data-commons</artifactId> <version>2.1.8.RELEASE</version> </dependency> </dependencies> -
spring整合redis发布订阅配置文件
-
redis.properties
redis.host=192.168.0.112 redis.port=6379 redis.maxIdle=30 redis.minIdle=10 redis.maxTotal=100 redis.maxWait=10000 redis.maxWaitMillis=1000 redis.blockWhenExhausted=true redis.testOnBorrow=true redis.db=0 -
applicationContext-redis.xml
<?xml version="1.0" encoding="UTF-8"?>
<beans xmlns="http://www.springframework.org/schema/beans"
       xmlns:xsi="http://www.w3.org/2001/XMLSchema-instance"
       xmlns:p="http://www.springframework.org/schema/p"
       xmlns:aop="http://www.springframework.org/schema/aop"
       xmlns:context="http://www.springframework.org/schema/context"
       xmlns:jee="http://www.springframework.org/schema/jee"
       xmlns:tx="http://www.springframework.org/schema/tx"
       xmlns:cache="http://www.springframework.org/schema/cache"
       xmlns:redis="http://www.springframework.org/schema/redis"
       xsi:schemaLocation="http://www.springframework.org/schema/aop
                           http://www.springframework.org/schema/aop/spring-aop-3.0.xsd
                           http://www.springframework.org/schema/beans
                           http://www.springframework.org/schema/beans/spring-beans-3.0.xsd
                           http://www.springframework.org/schema/context
                           http://www.springframework.org/schema/context/spring-context-3.0.xsd
									http://www.springframework.org/schema/jee
                           http://www.springframework.org/schema/jee/spring-jee-3.0.xsd
                           http://www.springframework.org/schema/tx
                           http://www.springframework.org/schema/tx/spring-tx-3.0.xsd
                           http://www.springframework.org/schema/redis
                           http://www.springframework.org/schema/redis/spring-redis.xsd"
       default-autowire="byName">

    <!-- 加载redis配置 -->
    <context:property-placeholder location="classpath:redis.properties" />

    <bean id="jedisPoolConfig" class="redis.clients.jedis.JedisPoolConfig">
        <property name="maxIdle" value="${redis.maxIdle}" />
        <property name="minIdle" value="${redis.minIdle}" />
        <property name="maxWaitMillis" value="${redis.maxWait}" />
        <property name="testOnBorrow" value="${redis.testOnBorrow}" />
    </bean>
    <!-- redis服务器中心 -->
    <bean id="connectionFactory"
          class="org.springframework.data.redis.connection.jedis.JedisConnectionFactory"
          p:host-name="${redis.host}" p:port="${redis.port}"
           p:database="${redis.db}" p:pool-config-ref="jedisPoolConfig"/>

    <bean id="redisTemplate" class="org.springframework.data.redis.core.RedisTemplate">
        <property name="connectionFactory" ref="connectionFactory" />
        <property name="keySerializer">
            <bean class="org.springframework.data.redis.serializer.StringRedisSerializer" />
        </property>
        <property name="valueSerializer">
            <bean class="org.springframework.data.redis.serializer.JdkSerializationRedisSerializer" />
        </property>
        <property name="hashKeySerializer">
            <bean class="org.springframework.data.redis.serializer.StringRedisSerializer" />
        </property>
        <property name="hashValueSerializer">
            <bean class="org.springframework.data.redis.serializer.JdkSerializationRedisSerializer" />
        </property>
        <!--开启事务  -->
        <property name="enableTransactionSupport" value="true"></property>
    </bean>

    <!-- 定义Spring Redis的序列化器 -->
    <!-- String序列化 -->
    <bean id="stringRedisSerializer"
          class="org.springframework.data.redis.serializer.StringRedisSerializer"/>
    <!-- jdk序列化-->
    <bean id="jdkSerializer"
          class="org.springframework.data.redis.serializer.JdkSerializationRedisSerializer"/>


    <!-- 将监听实现类注册到spring容器中 -->
    <bean id="redisMessageListener" class="com.silhouette.listener.RedisMessageListener"/>

    <bean id="topicContainer"
          class="org.springframework.data.redis.listener.RedisMessageListenerContainer"
          destroy-method="destroy">
        <property name="connectionFactory" ref="connectionFactory" />
        <property name="taskExecutor">
            <bean class="org.springframework.scheduling.concurrent.ThreadPoolTaskScheduler">
                <property name="poolSize" value="3"></property>
            </bean>
        </property>
        <property name="messageListeners">
            <map>
                <entry key-ref="redisMessageListener">
                    <bean class="org.springframework.data.redis.listener.ChannelTopic">
                        <!--channel-->
                        <constructor-arg value="mychannel" />
                    </bean>
                </entry>
            </map>
        </property>
    </bean>
</beans>
-
-
在web.xml 文件中配置加载spring容器
<!-- 加载spring容器 --> <context-param> <param-name>contextConfigLocation</param-name> <param-value>classpath:spring/applicationContext-redis.xml</param-value> </context-param> <listener> <listener-class>org.springframework.web.context.ContextLoaderListener</listener-class> </listener> -
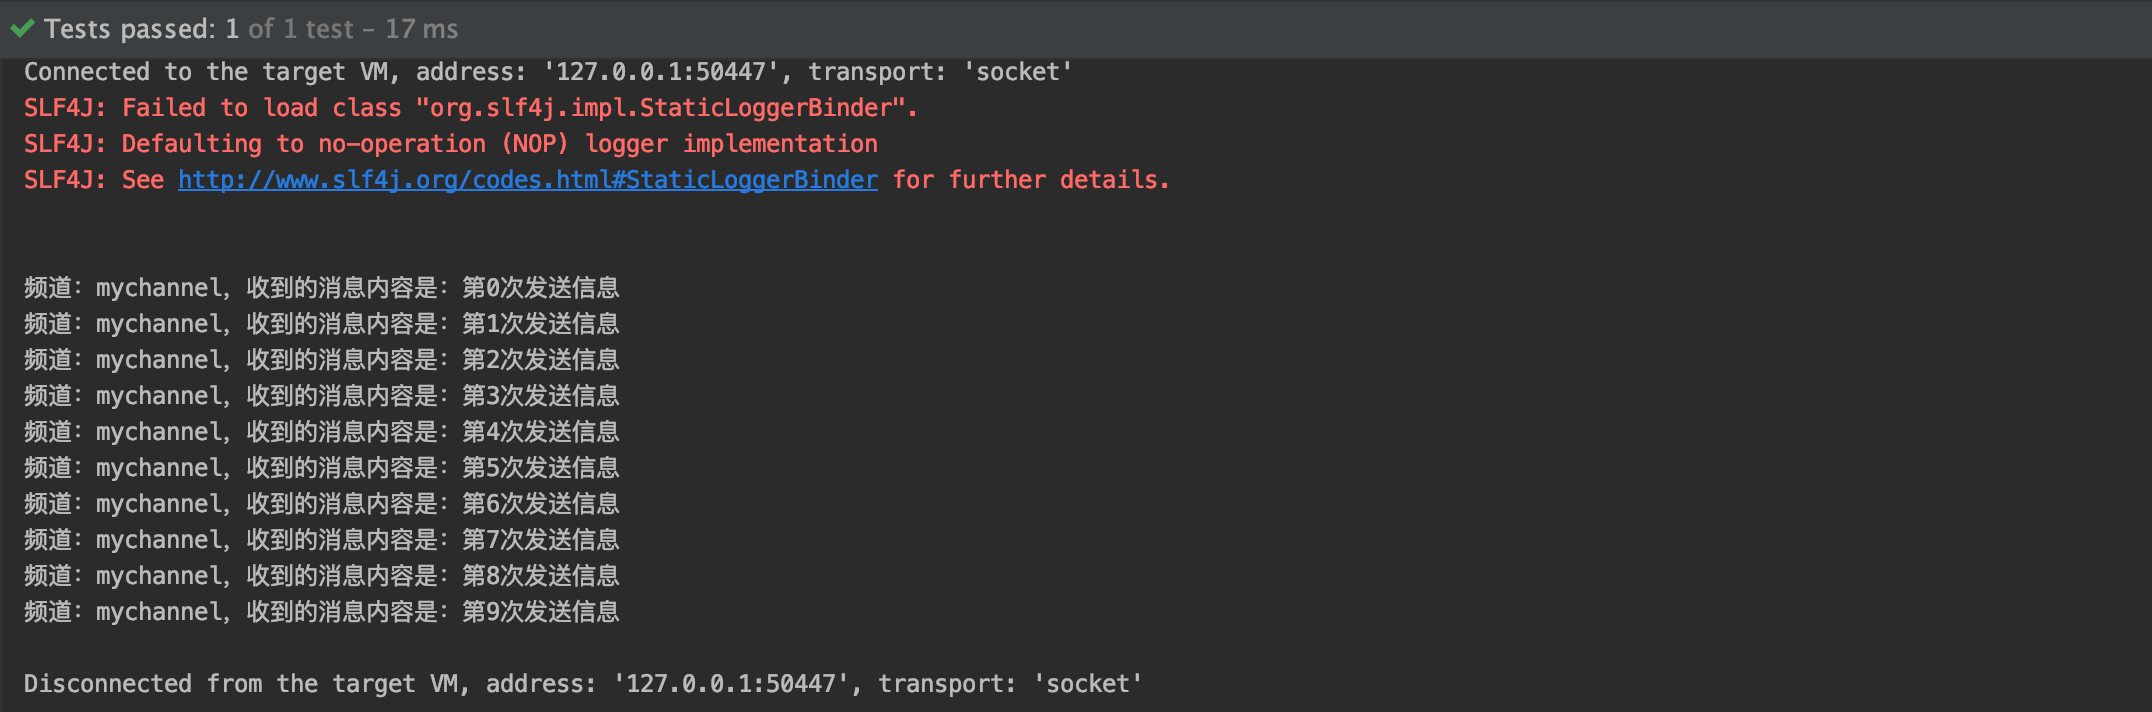
发布消息
@RunWith(SpringJUnit4ClassRunner.class) @ContextConfiguration(locations= {"classpath:spring/applicationContext-redis.xml"}) public class MessageTest { @Autowired private RedisTemplate redisTemplate; @Test public void testRedis(){ for (int i = 0; i < 10; i++) { redisTemplate.convertAndSend("mychannel", "第" + i + "次发送信息"); } //redis做缓存 redisTemplate.opsForValue().set("name","silhouette"); String name = (String) redisTemplate.opsForValue().get("name"); System.out.println(name); } } -
订阅消息
public class RedisMessageListener implements MessageListener { protected final Logger logger = LoggerFactory.getLogger(this.getClass()); protected RedisTemplate redisTemplate; public void setRedisTemplate(RedisTemplate redisTemplate) { this.redisTemplate = redisTemplate; } public void onMessage(Message message, byte[] pattern) { byte[] body = message.getBody();// 请使用valueSerializer byte[] channel = message.getChannel(); // 请参考配置文件,本例中key,value的序列化方式均为string。 // 其中key必须为stringSerializer和redisTemplate.convertAndSend对应 String itemValue = (String) redisTemplate.getValueSerializer().deserialize(body); String topic = (String) redisTemplate.getStringSerializer().deserialize(channel); System.out.println("频道:" + topic + ",收到的消息内容是:" + itemValue); } } -
运行测试